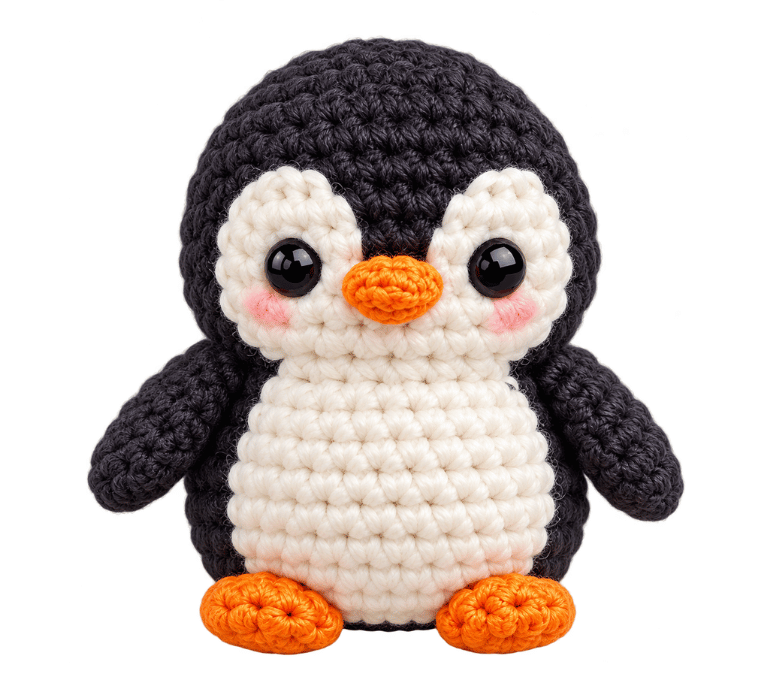
A tiny crochet penguin with a round belly, little flippers, and a sweet face? That’s the kind of handmade project that looks cute on a desk, makes a thoughtful gift, and works beautifully as a small amigurumi plushie. The best part is that you can create one with basic crochet stitches, a little stuffing, and a few carefully placed details.
This cute crochet penguin amigurumi pattern uses a simple rounded body, a contrasting white belly, small wings, and an orange beak and feet. You can customize the colors, add a tiny scarf, or turn your finished penguin into a keychain by adjusting the yarn and accessories.
The pattern uses US crochet terminology and works in continuous rounds. If you’re new to amigurumi, take your time with the increases and decreases. Those little stitches help shape the penguin, so a steady pace matters more than speed.
Materials
- Black or dark gray yarn: For the head, back, and body.
- White yarn: For the belly patch.
- Orange or yellow yarn: For the beak and feet.
- Crochet hook: Choose a hook smaller than the yarn label recommends if you need tighter amigurumi stitches.
- Polyester fiberfill: For a soft, rounded body.
- Safety eyes: Use 6 mm eyes for a small penguin, or embroider the eyes with black yarn.
- Yarn needle: For sewing the separate pieces and hiding yarn tails.
- Stitch marker: To track the beginning of each round.
- Scissors: For trimming yarn ends.
Measurements / Sizing
The sample pattern aims for a finished penguin around 4–5 inches (10–13 cm) tall when you use DK or light worsted yarn with a suitably small hook.
| Part | Approximate measurement |
| Full penguin | 4–5 inches tall |
| Body width | 3–3.5 inches |
| White belly | 2–2.5 inches tall |
| Each wing | 1.5–2 inches long |
| Each foot | 0.5–0.75 inches wide |
Gauge and Stitch Pattern
Amigurumi doesn’t require the same strict gauge as a fitted sweater, but tight, even stitches are essential. Loose stitches can leave gaps through which the stuffing becomes visible.
For this project, aim for approximately 20–24 single crochet stitches across 4 inches (10 cm), depending on your yarn and hook. Treat that number as a guide rather than a fixed requirement.
Before starting, crochet a small test piece in single crochet. Check whether the stitches look compact and whether the fabric stretches enough to reveal gaps.
Stitch Abbreviations
This pattern uses standard US crochet abbreviations.
| Abbreviation | Meaning |
| MR | Magic ring |
| ch | Chain |
| sc | Single crochet |
| inc | Increase: 2 sc in the same stitch |
| dec | Decrease: combine 2 stitches into 1 |
| sl st | Slip stitch |
| st / sts | Stitch / stitches |
| rnd / rnds | Round / rounds |
| FO | Fasten off |
| BLO | Back loop only |
| ( ) | Repeat or group instructions as indicated |
| [ ] | Total stitch count at the end of a round |
Skill Level – Intermediate
The body uses basic shaping. You’ll start with a small circle, increase the stitch count to create a rounded head and body, work several even rounds, and then decrease toward the bottom.
The separate pieces require a little patience during assembly. Positioning the belly, eyes, wings, and feet evenly makes a noticeable difference to the finished expression.
If you struggle with keeping track of rounds, use a stitch marker and count aloud. It might feel slow, but it’s much easier than discovering an extra six stitches near the end.
Notes Before You Start
Read these notes before crocheting the first round. They’ll help you understand how the pattern builds the penguin’s shape.
- Work in continuous spiral rounds unless the instructions say otherwise. Don’t join each round with a slip stitch.
- Place a stitch marker in the first stitch of every round and move it as you work.
- Crochet tightly enough to keep the stuffing inside the body.
- Count your stitches at the end of each round, especially after increases and decreases.
- Add stuffing gradually instead of pushing a large clump into the body all at once.
- Use the invisible decrease technique when possible. It creates a smoother surface than a traditional decrease.
The pattern uses a white belly patch sewn onto the front of the dark body. This construction keeps the main body simple while giving the penguin its classic two-color appearance.
Cute Crochet Penguin Amigurumi Pattern
Head and Body
Use black or dark gray yarn. Start at the top of the head and work downward in continuous rounds.
Round 1: Make 6 sc into a magic ring. [6]
Round 2: Inc in every stitch around. [12]
Round 3: Repeat (1 sc, inc) around. [18]
Round 4: Repeat (2 sc, inc) around. [24]
Round 5: Repeat (3 sc, inc) around. [30]
Round 6: Repeat (4 sc, inc) around. [36]
Rounds 7–13: Sc in every stitch around. [36]
You should now have a rounded upper section that will form the penguin’s head and shoulders. If the circle starts to curl inward slightly, don’t panic; the later rounds and stuffing will help establish the shape.
Place the Eyes
Pause before decreasing the body. Position two 6 mm safety eyes between Rounds 9 and 10, leaving approximately 6–7 stitches between them.
The exact spacing depends on your tension and the look you want. Place the eyes temporarily and check the expression from the front before securing them.
If you use embroidered eyes, stitch two small black or dark brown eyes into the face. You can also add tiny white highlights with embroidery thread for a softer, cartoon-like appearance.
Shape the Body
Continue with the same dark yarn.
Round 14: Repeat (4 sc, dec) around. [30]
Round 15: Sc in every stitch around. [30]
Round 16: Repeat (3 sc, dec) around. [24]
Round 17: Sc in every stitch around. [24]
Begin adding stuffing through the opening. Spread it evenly around the head and body instead of filling only the center.
Round 18: Repeat (2 sc, dec) around. [18]
Round 19: Repeat (1 sc, dec) around. [12]
Add a little more stuffing and shape the penguin with your fingers. Keep the upper section rounded while giving the lower body a gently tapered shape.
Round 20: Dec around. [6]
FO, leaving a tail. Thread the yarn through the front loops of the remaining stitches and pull gently to close the opening. Secure the yarn and hide the tail inside the body.
Your penguin now has its main shape. Aim for a plump oval rather than a perfect sphere, because a slightly taller body gives the wings and feet more room.
White Belly Patch
Use white yarn to create the oval belly. You can crochet the patch separately and sew it onto the front of the body.
Round 1: Make 6 sc into a magic ring. [6]
Round 2: Inc in every stitch around. [12]
Round 3: Repeat (1 sc, inc) around. [18]
Round 4: Repeat (2 sc, inc) around. [24]
Round 5: Repeat (3 sc, inc) around. [30]
FO and leave a long sewing tail.
This patch creates a rounded oval-like shape, although the exact outline will depend on your tension. Flatten it gently with your fingers before attaching it.
Place the patch on the front of the body, centered beneath the eyes. Pin it in place with stitch markers or spare yarn so it doesn’t shift while you sew.
Use the yarn tail and a yarn needle to sew around the edge. Pick up a small amount of fabric from both the patch and body with each stitch, keeping the sewing tension even.
If the patch looks too wide for your penguin, omit the final increase round or use a smaller hook for the belly. The goal is to leave a visible border of dark yarn around the white area.
Make Two Wings
Use black or dark gray yarn.
Round 1: Make 6 sc into a magic ring. [6]
Round 2: Repeat (1 sc, inc) around. [9]
Rounds 3–6: Sc in every stitch around. [9]
FO, leaving a long sewing tail. Flatten each wing gently and don’t add stuffing unless you want a chunkier look.
Make two matching wings. Place them along the sides of the body, slightly below the eyes and alongside the upper half of the white belly.
Sew each wing securely to the body. Angle the tips slightly downward for a relaxed penguin shape, or angle them outward to make the penguin look as if it’s ready to waddle off on an important penguin mission.
Check both wings from the front and side before securing the yarn tails. Small differences in angle can change the toy’s entire expression.
Crochet the Beak
Use orange or yellow yarn.
Round 1: Make 4 sc into a magic ring. [4]
Round 2: Sc in every stitch around. [4]
FO, leaving a long tail for sewing.
Shape the little piece into a short, rounded beak with your fingers. You can add a tiny amount of stuffing if the yarn creates a hollow shape, but most small beaks look better without it.
Position the beak between the eyes, just below their level. Sew it securely to the body, taking small stitches around its base.
For a flatter, more triangular beak, embroider a small orange triangle instead of crocheting a separate piece. This option works particularly well for mini penguins and keychains.
Crochet Two Little Feet
Use orange yarn.
Round 1: Make 6 sc into a magic ring. [6]
Round 2: Inc in every stitch around. [12]
FO, leaving a sewing tail.
Make two matching feet. Flatten each circle slightly, then sew it to the lower front of the body beneath the white belly.
Keep the feet close enough to support the penguin’s rounded shape without overlapping too much. If you want the toy to stand, position the feet evenly and check its balance before tying off the yarn.
For a more defined foot shape, embroider two short orange lines on each foot to suggest toes. You don’t need complicated shaping to make these small details work.
Assembly & Finished Size
Assembly brings all the separate parts together, so take a few minutes to check the placement before sewing everything permanently.
Follow this order for a tidy finish:
- Attach the belly: Center the white patch on the front of the body and sew around the edge.
- Secure the beak: Position it below and between the eyes.
- Sew on the wings: Attach one wing to each side at a matching height.
- Attach the feet: Place them at the bottom of the body, slightly apart.
- Check the shape: Gently adjust the stuffing through the fabric if the body looks uneven.
- Hide the yarn tails: Weave each tail through several stitches before trimming it.
Once you finish the assembly, your penguin should measure approximately 4–5 inches tall. Small variations are normal, especially if you use a different yarn weight or crochet with a tighter tension.
Conclusion
This cute crochet penguin amigurumi pattern combines a rounded body, a white belly, tiny wings, and an orange beak and feet to create a charming handmade plushie. The basic shapes make it manageable for beginners who already know a few essential crochet stitches, while the separate details leave plenty of room for creativity.
Remember to count your stitches, use tight and consistent tension, stuff the body gradually, and check the placement of each feature before sewing it in place. Those small habits can make a big difference to your finished toy.
Whether you keep your penguin on a desk, add it to a handmade collection, or make a few in different colors for gifts, you can use this pattern as a starting point for your own designs. Pick your yarn colors, grab your hook, and give your little penguin its own personality. 🙂
FAQ
My penguin looks too round
Add slightly less stuffing around the middle and shape the body into a vertical oval with your fingers. If the toy still looks too spherical, try working one or two additional even rounds before starting the decreases in a future version.
Stuffing shows through the stitches
Switch to a smaller hook or tighten your tension slightly. Avoid pulling the yarn so tightly that you struggle to insert the hook, because uncomfortable tension can make the fabric uneven.
The belly patch looks crooked
Remove a few sewing stitches and reposition the patch. Use temporary stitch markers at the top, bottom, and sides to align it before sewing again.
The penguin won’t stand upright
Check whether the feet sit at the same height and whether the stuffing distributes evenly across the base. A slightly flatter bottom and well-positioned feet can improve balance, although a soft amigurumi penguin may still sit better than it stands.
The face looks different from the sample in your mind
Move the eyes and beak before securing them permanently. Wider eye spacing creates a different expression from closely spaced eyes, and even a tiny change can make the penguin look sleepy, surprised, or extra sweet.